Showing posts with label rice. Show all posts

Mushroom Rice

A Mushroom Rice all made in one pot! Tip: stir through half the browned mushrooms at the end for maximum flavour. www.recipetineats.com
Mushroom Rice
Prep Time
10 mins
Cook Time
20 mins
Total Time
30 mins
One for mushroom lovers! Worthy of being a meal in its own right, my two key tips to make an extra tasty mushroom rice are: 1) stir in half the browned mushrooms at the end 2) brown the mushrooms well so the base of the pot turns brown, then deglaze it with broth so all that flavour ends up in the rice as well as staining it a lovely earthy brown colour. The amount of liquid to rice ratio I use yields a tender just cooked rice that is fluffy. Recipe VIDEO below. Serves 4 -5 as a main or 8 as a side.
Servings: 4 - 8 people
Calories: 261 kcal
 
Ingredients
  • 2 - 3 tbsp olive oil , separated
  • 30 g / 2 tbsp butter
  • 750 g / 1.5 lb mushrooms , sliced 3 - 5 mm / 1/8 - 1/5" thick (Note 1)
  • 2 garlic cloves , minced
  • 1 small onion , finely diced
  • 1 1/2 cups long grain rice (Note 2)
  • 2 1/4 cups / 565 ml vegetable stock / broth (or chicken) (Note 3)
  • 1 1/2 - 2 cups sliced green onion / scallions
  • Optional: More butter to stir through
Instructions
  1. Heat 2 tbsp oil in a large pot over high heat. Add half the mushrooms, and cook for 5 minutes until golden. Season with salt and pepper then remove and set aside.
  2. If the pot is dry, another 1/2 - 1 tbsp oil, and add butter. When melted, add onions and garlic.
  3. Cook for 30 seconds, then add remaining mushrooms. Cook for 5 minutes or until mushrooms are lightly browned (they won't caramelise as well as the first batch) and the base of the pot is brown.
  4. Add rice and a splash of broth. Mix so the brown stuff on the bottom of the pot mixes into the liquid. (Video below helpful here)
  5. Once the base of the pot is clean, add remaining liquid. Place lid on, bring to a simmer then turn down to medium low.
  6. Cook for 15 minutes or until there is no residual liquid (tilt pot to check).
  7. Remove from stove, remove lid, QUICKLY toss in reserved mushrooms and scallions, put lid back on. Leave for 10 minutes (do not skip this step!).
  8. Fluff rice using a fork or wooden spoon. OPTIONAL: Stir through more butter. 🙂 Serve!
Recipe Notes
1. Use any mushrooms you want, I used normal button mushrooms, it's even more mushroomy if you use Swiss Brown / Cremini mushrooms. Don't slice them too thin otherwise they literally disintegrate!

Mushrooms do "suck up" oil but don't be tempted to add more oil until the end if needed. When raw, mushrooms suck up the oil, but then as they cook, release water and the oil, so this helps them brown towards the end. But if you do find they are looking dry, add just 1 tsp towards the end of browning.

2. Basmati and jasmine would also be great here, comes out nice and fluffy like long grain rice. I find that medium and short grain rice is a bit sticky for my taste when cooked pilaf style. Risotto rice, sushi rice and paella rice are not suitable. Please use uncooked rice.

BROWN RICE: Follow recipe but use 2 1/2 cups liquid for tender, fluffy rice (or 2 3/4 cups for soft rice) and it will take around 45 minutes to cook on the stove (check at 35 minutes, then every 5 minutes until liquid is absorbed).

QUIONA: This will also work with quinoa but adjust the recipe as follows: rinse quinoa, use 3 cups of liquid (I would prob do 2 cups broth, 1 cup water), follow recipe but cook for 20 minutes.

3. The amount of liquid to rice ratio I use yields a tender just cooked rice that is fluffy. If you like your rice on the soft side, use 1/2 cup extra liquid but note that the rice will be stickier rather than fluffy like what you see in the video and photos.

4. SERVES: Makes around 7 cups of rice (packed) which will serve 8 as a side or 4 as a main. YES it's a lot but it will keep well in the fridge for a few days and it freezes well too!

5. Nutrition per serving, assuming 8 servings.

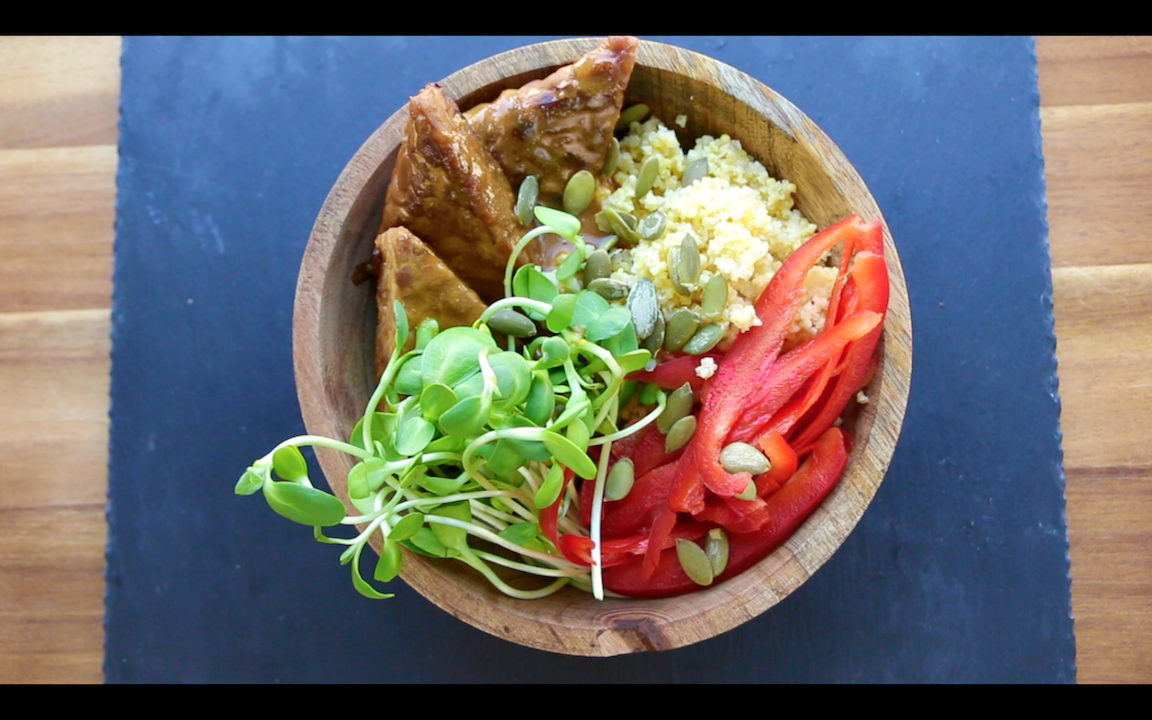
Dragon Bowl


Ingredients

See: https://www.thebuddhistchef.com/recipe/dragon-bowl/

Directions

1
In a bowl, combine the toasted sesame oil, soy sauce, maple syrup and vegetable broth.
2
Cut the tempeh into triangles and place in a pan. Pour the vegetable broth mixture over the tempeh. Simmer on high heat, until the broth is absorbed, about 15 minutes.
3
Sauce: Combine maple syrup, vegetable oil, powdered garlic, soy sauce and nutritional yeast. Mix well. If too thick add a little water.
4
Serve in a bowl along with quinoa, sunflower sprouts, minced red pepper and garnish with pumpkin seeds.

Rickshaw Brown Rice Nourish Bowl with Coconut Peanut Sauce


▸ ▹ Vegan, gluten-free, refined sugar-free
Yield: 4 servings
Prep Time: 10 min
Cooking time: 30 min
Total Time: 30 min

INGREDIENTS: The Bowl
2 cups dry brown rice, rinsed
1 reduced-sodium vegetable bouillon cube
1 tsp vegetable oil
1 tsp sesame oil
1 medium red onion, thinly sliced 
2 cloves garlic, chopped 
1/2 small red cabbage, thinly sliced
1/2 Tbsp soy sauce
3 medium carrots, julienned 
2 medium red bell peppers, julienned 
1 cup frozen shelled soybeans 
180 g pre-seasoned tofu strips 

INGREDIENTS: The Sauce
2 1/3 cup peanut butter 
1/3 cup light canned coconut milk
1 lime, juiced 
1 Tbsp soy sauce
1/2 tsp hot sambal, or other chili hot sauce 

INGREDIENTS: Optional Garnish
raw or roasted, unsweetened coconut flakes
roasted peanuts
bean sprouts (not pictured) 

Directions
  1. In an uncovered medium pot bing the rice, 4 cups of water and the bouillon cube to a boil, then reduce to a simmer until al dente, about 30 minutes.  Tip: crush the bouillon cube before adding it to the water to ensure it dissolves equally throughout.
  2. While the rice is cooking, prepare the sauce by adding all the ingredients plus 1 Tbsp hot water to small bowl, and whisk until well combined. Add more hot water if desired to achieve a thinner sauce. Set aside. 
  3. In a separate large pot on high heat add the oils, onion and garlic, stirring until the onions soften, about 2 minutes. Reduce the head to medium-high and add the cabbage and soy sauce, stirring again until the cabbage softens, about 2 minutes. Finally add the carrots, bell peppers, soy beans and tofu for another two minutes. Set aside. 
  4. When the rice is done add the vegetables on top and drizzle on the sauce.

Notes
  1. Speed-it-up: soak the rice in advance to quicken the cooking time.  Also, purchasing pre-seasoned tofu strips as opposed to seasoning your own as I did in this recipe significantly cuts down on preparation time. 
  2. Leftovers: this recipe is delicious enjoyed the next day as well. Store in an airtight container in the fridge for up to 4 days, although I recommend adding the sauce at the time serving after the rice and vegetables have been re-heated. Enjoy!

Brown Rice & Green Bean Miso Salad


And the thing with most salads: they are deceiving. How so? The dressing. Loads and loads of oil in most dressings. 

Dietitian's recommendation: next time you buy a salad dressing, check the ingredient list. The ingredients are listed in descending order by weight. I bet you a pretty penny that oil is in the first three ingredients. 

This salad is low in oil compared to most salad dressing recipes. 
Much of the flavour comes from the miso paste, a fermented ingredient that offers probiotics and enzymes to improve your overall intestinal flora. 

I use miso paste a lot, especially in salad dressings. It gives a very distinct taste that will instantly make your dish taste Asia-inspired. To purchase your own, try any Asian supermarket.
Once bought, store in the fridge - it can be kept for quite some time without any concern or change in quality.
Dietitian's recommendation: soaking the rice overnight cuts down the cooking time from 45 minutes to just under 20 minutes. Plus, there are loads of other benefits to soaking that you can read about in this PUL article.

Of course you don't need to soak your rice... it's just that I don't like waiting around for my food to be ready. You know?

Note: green beans contain anti-nutrients and may be mildly toxic if consumed raw, causing nausea, sickness and abdominal pain in some individuals. This may not be an issue for everyone or if consumed in small quantities, but as a precautionary measure it may be best to briefly cook the beans to avoid any abdominal discomfort.

~~~

▸ ▹ Vegan, gluten-free, refined sugar-free, nut-free
Yield: 2 large servings, 4 small servings 
Prep Time: 10 min
Cook Time: 20 min (excluding soaking time)
Total Time: 30 min


INGREDIENTS: SALAD
1/2 cup brown rice, soaked overnight*
1/2 vegetable bouillon cube 
10 long flat green beans, cut into thirds**
2 medium red bell peppers, diced
1/2 medium red onion, minced 


INGREDIENTS: Dressing
1 small lime, juiced
2 tsp olive oil
1 tsp sesame oil
2 tsp miso paste 
1 tsp soy sauce
1 tsp rice vinegar, or other vinegar 
1 cm chunk fresh ginger***
pepper to taste 


Directions
  1. Drain the soaked brown rice and add to a medium pot over high heat. Add 1 cup of water and crush in the bouillon cube. Note: if the bouillon cube is added without crushing it can get stuck to the bottom of the pot and not evenly distribute. Bring to a boil, then reduce to a simmer and partially cover with a lid. Cook until al dente, about 20 minutes. If a small amount of moisture remains, remove the rice from the element and put the lid on tightly. The rice will absorb the extra moisture and become more fluffy, and less gummy. 
  2. With the rice is cooking, cut the vegetables and prepare the salad dressing by adding all the ingredients to a blender, and blend on high until well combined. Note: if using ginger powder instead of fresh ginger, you can whisk this in a bowl instead of blending. 
  3. Add the cooked rice and vegetables into a medium bowl. Add the dressing and toss until coated. Enjoy immediately or allow the rice to marinate in the sauce in the fridge and serve later. 


Notes
  1. *If not soaking overnight, cook in 1.5 cups water and cook for 45 minutes. 
  2. **Green beans contain anti-nutrients and may be mildly toxic if consumed raw, causing nausea, sickness and abdominal pain in some individuals. This may not be an issue for everyone or if consumed in small quantities, but as a precautionary measure it may be best to briefly cook the beans to avoid any abdominal discomfort. If choosing to do this, cook in boiling water for about 10 minutes, or until al dente.  
  3. *** Substitute with 1/4 tsp ground ginger if not using fresh. 
  4. Variations: add any vegetables you like! 
  5. Speed-it-up: by soaking the rice the night before, or at least a couple hours before preparing!
  6. Storage: store in an air-tight container in the fridge for up to two days.

copyright © . all rights reserved. designed by Color and Code

grid layout coding by helpblogger.com